THANKS TO OUR SPONSOR!

THANKS TO OUR SPONSOR!
Your Ad here
Be sure to sign up for the weekly RV Travel Newsletter, published continuously every Saturday since 2001. NOTE By subscribing to RVTravel you will get info on the newest post on RV Tire Safety too
. Click here.
Huge RV parts & accessories store!
You have never seen so many RV parts and accessories in one place! And, Wow! Check out those low prices! Click to shop or browse!
Showing posts sorted by date for query autopsy. Sort by relevance Show all posts

Saturday, October 29, 2022

Tire Autopsies - Run Low Flex Failure and Impact break

 I thought it might help to show a few examples of what was observed while doing a "Tire Autopsy".

A tire would be received with a complaint letter. The letter might say something like " I was driving down Route 66 at 55 mph when suddenly I had a blowout. I wasn't speeding and had checked the inflation just that morning. What is wrong with your tires? There must have been a defect.

The tire looked like this. 


Another view 


On close inspection I found what looked like a hole in the upper sidewall where the

rubber had been worn away.


 Using a bent paper clip,


I was able to confirm the hole


and looking inside we can see where the puncturing item

went.


Note a bent paper clip will fold at the bend if you try

 and push it through a tire sidewall, but if there is a

 hole the paper clip can follow the hole.

For this case I provided the above information and pictures.

====================================

Another complaint involve a bulge in the tire sidewall.

 The location was marked by the tire dealer.


On the inside we see a lump


We can also see a dark curved line where the tire

had extra bending.


By cutting away the rubber from the inside of the tire,

down to the body cord we can now see the broken

cords from the impact.


I trust that after seeing these examples you have learned that

sometimes additional examination is required to find and 

confirm the actual failure.

After doing hundreds of similar examinations it allows the

experienced examiner to quickly identify that the reason for

 a tire failure was not some design or manufacturing "Defect",

but the result of external causes.

More like thin in future posts.

Friday, August 26, 2022

Can you do a tire "Autopsy" at home?

 When you have a tire failure many people are only interested in replacing the tire as soon as possible. But there are others that want to understand the "why?" of the failure so they can take the steps necessary to avoid a re-occurrence of the problem for if you don't know the real basic reason for the failure any corrective action you might take may not actually "fix" the problem.

Think of a car not starting. If you jump to the conclusion that the reason for the non-start, is a bad battery when it really is the first signs of a failure of the starter motor or a failure of the ignition switch, the new battery will not "fix" the no start problem will it?

Now I am not saying that everyone needs to have the tools and skill to do the "autopsy" shown below but when I was working as a Forensic Tire Engineer I was expected to dig deep and to learn the real reason for a tire to fail. 

It is in my basic nature to be inquisitive, so when I was contacted by an RV owner who had what he thought was a tire about to fail I decided that I could help him learn and understand the "why" when he started asking questions as many engineers do.

The following is what we did and what we learned.

As you can see the tread is very round.


This is not normal for a steel belted radial tire.


John, the owner measured the OC of all 4 tires and found a big difference with one tire being an inch larger than the others.


Clearly something was different this tire.


After removing the tire from the rv and looking closely at the tire he noticed that one portion of the tread seemed to "bulge" outward.


His next step was to confirm the tire was no longer round.


 After de-mounting the tire and inspecting the interior he said he could not find any indication of failure. At that point John contacted me and after some back and forth I told him how to dissect the tire so he could ship the tread portion to me for a more detailed inspection.

You can see the work he had to do to get the tire tread area cut from the rest of the tire.


This was John's effort to

find the belt separation,

but he was not sucessful.

When I received the tread my experienced eye quickly found the location of the belt separation.

This level of effort on John's part was extraordinary but we got the evidence to prove a belt separation as the reason for the bulge in the tread area.

Now you don't need to go to all this effort as a simple "Free Spin" inspection as seen in this YouTube video will provide the evidence you would need to decide if it is time to replace your tires.

I have recommended that owners of RV trailers do a "Free Spin" inspection once a year or every 2,000 miles. This schedule might line up with when you inspect brakes or re-pack the wheel bearings so the Free Spin is not any additional effort and if you discover a wobble or bulge in your tire you know that it's probably time to replace it rather than wait for it to come apart on the side of the Interstate. 


Friday, July 22, 2022

Do you "Read the Label" on your tires as you do when shopping in the Grocery store?

 A question was posed on what would be a good replacement for a GYE tire in trailer application.

Here is the question and my answer.

John said "It is time to replace 4 tires on my Airstream. The current tires are GYE ST225/75/R15 LR-E. My dealer says GY Endurance in my size is unavailable from his distributors and is highly recommending Hercules as replacement, noting that they are cheaper, 10 ply and customers have been happy with results.
Any experience or feedback on Hercules ST tires?
I can get the GYE from an online dealer, so they are available.
I prefer to stay with ST tires.Thanks.
"


IMO one feature that has allowed GYE ST type tires to have a better reputation than other or older ST type tires is the presence of a Nylon "cap ply". While there are or may be other features used in that line of tires, it is not possible to know what they are without being a GY tire engineer, which I am not.
But when you read the material list that is molded on the tire sidewall you will see "Nylon" layer on top of the steel belts. When I was able to inspect a GYE that was sectioned for analysis and doing an "autopsy", I confirmed the presence of such a construction feature and it would be illegal to say you had a Nylon ply, if there was no such layer, I have every reason to believe that Goodyear is using that construction feature in the entire GYE ST tire line.
 
If there are other tires you are considering for purchase, along with confirming the candidates are ST type and of the same dimensions and same Load Range I would recommend that you read the material list molded on the tire sidewall.

Many people have learned to "Read the label" when shopping in the grocery, so it is a similar action to "Read the label" of the reinforcing materials in a tire.

A side note. I doubt that the Hercules are really "10 ply". More likely they are Load Range E the same as the GYE. When you read the label on your current tires and any tire you are considering the label will tell you the actual number of layers of the different materials. If in fact the dealer told you "10 ply" I have to wonder about the competence and training of that salesperson as when you read the tire material "label" on the tire sidewall you will probably see something like "Sidewall 1 layer Polyester, Tread 1 layer Polyester + 2 layer Steel + 1 Layer Nylon"

##RVT1062

Friday, November 12, 2021

Are IR guns good for detecting low inflation in tires?

 Comment of Facebook about RV tires

"I carry a heat gun with me. When I stop I check all tires. If one is a lot hotter than the rest I have a problem."

and another

"A cheap harbor freight gun is a good investment. We carry two when I tow my boat to the keys. Each stop my buddy and I have a gun in each door. We each shoot all four wheels then compare noted about what we got as far as readings."

 My response:

As a tire engineer I can advise that IR guns are OK for checking the temperature of metal items such as wheels, hubs or brake drums that conduct heat but rubber is an insulator and very poor conductor of heat so no IR hand gun I know of can detect a meaningful temperature at a rest stop as it isn't the average temperature of a tire that can result in a failure but a spot, maybe smaller than a quarter that you have to worry about. What testing have you done to learn that exact spot over the entire surface of your tires?

The hottest location (most likely to fail or cause problems is also about 1/4" deep inside the structure). Heat is the result of running overloaded or under-inflated. Scale measurement is the only reliable way to know if you are overloaded. Pressure readings are the only reliable way for a consumer to know if they are running under-inflated. You can pick up a nail or cut or have a leaking valve and be underinflated within a few minutes and have a failure a few miles later. The tire I covered in my detailed post where I did a visual "Autopsy"reportedly had it's air pressure checked just 50 miles before the catastrophic "Blowout" run low flex failure. A leaking valve core from improper seating is one possible reason for the air loss the led to the failure. A TPMS is the only reliable way to know the actual running pressure unless you stop every 5 to 10 minutes and check with a gauge and confirm your valve core has properly sealed after you check the pressure. A TPMS can even sometimes warn of brake or bearing problems because the heat is transferred through the metal parts to the metal base of the TPM sensor. 

I do think these low cost temperature sensors have other uses such as checking the temperature of your furnace output or confirming the electrical connections in your 'fuse box" are not getting  overheated. Even the heating element in you absorption refrigerator can be checked. I did use my IR gun to check the surface temperature of my tires when I did my test on tire covers but running tires have a wide range of temperatures as seen here with the output from a $10,000 IR camera. Note the wide range of operating temperatures (80F to 130F) in close proximity ( 0.10") when the passenger tire was run with 27 psi.

 
It only takes a few seconds for the surface temperature to drop significantly which would be less time than it takes you to come to a stop in a rest area so your readings would not reflect the important temperatures near the tire hot spot.


##RVT1026

Friday, March 5, 2021

Question about tire company building bad tires. Are China Bombs built on purpose?

This as a long post but I wanted to share the type of questions i sometimes get.

" Good Morning' Roger. First, thank you for helping to dispel the misinformation about the care & feeding of consumer tires. 

    My training & work history is in the military & general aviation world. After a 24 year Air Force career and 17 years with Cessna in Wichita KS I've learned a great deal about tires. I've also had a near miss with some tires back in the day. 
   I had a set of Light Truck tires on our '84 Ford E350 15 passenger van. Not long after a tire story broke in the news, I looked at the tires installed on our van. No defects noticed, inflation correct, continue in service. 4 days later, while on the road to KC from Wichita I felt a vibration develop. I pulled to the shoulder and discovered a blister in the sidewalk of a rear tire. I installed the spare & the trip continued without incident.
    The following Monday I presented my defective tire to my local tire dealer. He was very apologetic for the defective tire. He replaced the remaining tires with a set of Bridgestones of comparable size. The whole incident was handled well.
   At the time I couldn't get the one tire that failed. I wanted to perform an autopsy of sorts. The dealer wasn't having any of that, which I understand. At the time the problem with the tires was explained to me that the sidewall de-lamination was caused by an incomplete cure process. The process was incomplete because a manager thought the vulcanizing process would run its course even after the tire was removed from the press. It was later reported that an inferior compound was used in the process. 
    So, I guess my question is, in the Light Truck tire incident, was it improper substitution of a material or a management failure in order to increase production that lead to the failures? Do Chinese made tires exhibit similar problems? Can the NTSB outlaw them? It's all above my pay scale. Just want to see some reliability in RV tires.
   I will continue to recommend your Blog to others in an effort to combat the misinformation surrounding tires. 
   Reply when you get time. It's a cold Sunday morning here & I'm working on the second cup of coffee. In this day & age, I don't do anything in a hurry & my upper arm is getting cold as my sleeve is rolled up waiting on my vaccine, but we'll survive. Stay safe, stay warm.
 
 
My answer:
Where / how did you get the information that the tire with the sidewall problem had some "inferior" compound?

Without a lot more data it's hard for me to pass judgment on tires made in the early 80's. I can however relate a personal experience that I have written about previously. This may shed some light on tire quality.
By late 2000 my primary job responsibility had become doing forensic tire inspection and analysis. I came across one almost new (weeks old) passenger tire with the steel in the belt having lost all adhesion to any rubber. There was only one tire and at the time no report of other similar tires. Many times single tire issues get set aside as a "single data point" is hard to establish any trend.  A few weeks later I was presented with two more tires with belt issues and upon conducting an autopsy discovered these tires had steel in one of the two belts, BUT NOT BOTH, having no adhesion to the rubber. The other belt had normal levels of adhesion. Recalling the single earlier tire I dug deeper.
Eventually, after some investigation and some test results from the chemistry lab, it was confirmed that a single batch of approximately 145 lbs of the rubber had been improperly labeled in the factory and built into about 150 tires. I notified the VP of Corporate QA and a recall was initiated with the permission of NHTSA (the agency like NTSB but dealing with automobiles, not commercial vehicles such as buses or airplanes). The recall covered some 6,000 tires as the effort required the recovery of all tires that were cured the week when the factory mistake was made.
Technically we knew that with only 145 lbs of rubber involved and the specific process used in that plant that a maximum of 150 tires could have been affected but since tires are recalled based on the DOT serial and all tires made in any one week carry the identical serial that was the only option.  It turns out that most of the tires were still in the warehouse which made completing that recall easier as many times even when recall notices are published a significant portion of the public does not pay attention.

Your suggestion that some inferior material was intentionally used in your LT tires just doesn't seem plausible as NHTSA would have ordered a recall of all suspect tires if there was data that supported the idea that some substandard material had been used.

In modern tire manufacturing, most rubber compounds are used in many different sizes and types of tires. I would say that the sidewall rubber in the Light Truck tire would probably have been used in most if not all LT tires being made at that time which would have involved millions of tires.

It is also true that tire store dealers do not get detailed training in tire forensics so sometimes they tend to simplify the explanation for a problem. When tires are "adjusted" and replaced however those tires are sent to be inspected, in detail, by engineers with the necessary training and experience. If manufacturing errors, as found in my example, are confirmed, appropriate action is taken as there are serious financial fines for knowingly allowing tires that do not pass DOT requirements to be sold or used.

All tires sold for highway use are certified by the tire manufacturer to be capable of passing the DOT test requirements and the data I have seen, including a number of tires made in China, shows that the tires meet the DOT requirements. The "China Bomb" concept is a combination of improper use and improper understanding of statistics. It is a known fact that a majority of tires on RV trailers are overloaded. Also, some 90+% of the tires applied to RV trailers were for a number of years were made in China. With these known facts is it any wonder that there were tire failures on RV trailers and that most of those failed tires had been made in China? Many people jumped to the incorrect conclusion that since very few tires failed on their passenger cars or pick-ups and that the tires on their cars and pick-ups were not made in China. That the China-made tires must somehow be "defective" even while never being able to identify any specific "defect".

A side issue. You mentioned a desire to "perform an autopsy of sorts" immediately raises the question in my mind of how and what you thought you would do when doing your first tire autopsy? I suggest you read these blog posts where I mention "Autopsy" and ask yourself if you would have noticed or been able to identify the evidence I pointed out in these examples. And if you had noticed the details do you think you would have reached the same conclusions I did?

Hope this gives you something to read and think about on a cold day in March.
 
##RVT990
 

Friday, January 31, 2020

RV Tire warranty. How do engineers "read" tire conditions?

Read the following on an RV forum
"Carlisle Tire's warranty used to state "tires must be inflated to sidewall stated pressure or warranty is void"; I don't know about now though.
How in the world do they determine if the tires are inflated to sidewall pressure? Is there a little gremlin with a report card in each tire. Some manufactures just never get out of the box.
Unless it was a bad tire, had been run flat previously, and most likely a bunch of other possibilities.  At the time of a blow out there is no way they would know other than by assumption.
Yes, most probably operator error, but only assumptions."


Sorry, but there are ways to identify the probable inflation & load history of a tire. Just as a Medical Examiner can do an autopsy and identify the signs of bad diet and poor or no exercise, or years of smoking, it is many times possible to see the physical signs of low inflation and high load.


These signs can show up in the indentation into the tire left by the wheel.


Here are examples of improper inflation or a Run Low Flex Failure of a P type, ST or LT type tire.

Melted body cord is physical proof of extreme run low 


Also, the different flex markings can be seen on the interior of a tire. In extreme cases the Innerliner (special rubber that holds air in much like a tube did in tube-type tires)


Manufacturing "Defects" will usually result in early life failure i.e. <1,000 miles.  Tire failure is in itself not proof of some nebulous "defect" even though lawyers and those not experienced in failed tire inspection want to think so.
Once you examine, in detail, a few thousand tires from both controlled testing and from day to day use & abuse the conditions seen in tires tell a story of the tire's history.
Too often people simply think of the conditions (load, speed, inflation, road) at the moment the tire fails as the "facts" to be considered when trying to decide the "why" a tire failed. In reality, the damage might have been done hours, days or even months earlier.
See THIS post on a study of pot hole damage and how long it took for some tires to fail from the impact.


As I point out in my "RV Tire Knowledge" Seminars at RV Conventions, tires are like potato salad, putting the salad back in the refrigerator after it was left for hours in the hot sun does not "fix it" and make it good to eat the next day any more than taking the burnt hot dog off the grill and letting it cool down before serving it makes for a good meal. Adding the correct air in a tire after running it low for thousands of miles, does not repair the damage. Slowing down to 50mph after hours of speeds of 70 to 80+ over the preceding weeks and months does not "fix"  or heal the thousands of microscopic cracks that were formed in the overheated and overstressed belt rubber. Once a crack is initiated it does nothing but grow. If a person stopped his smoking addiction of 2 packs a day for 40 years a couple months ago, will his lungs be clean and clear today? Not a chance.

When examining a tire, I look at the physical condition of a tire and specifically what evidence there might be. Years of experience has taught me what to look for and allows me, as a court-certified "Expert", to form an opinion that is based on the examination of many thousand tires.

##RVT933

Friday, March 15, 2019

How much Reserve Load or "Headroom" is enough?

Following an RV forum discussion on How much extra load capacity or "Reserve Load" or "Head Room" is enough. Some folks had moved from LR-C to LR-D  others to LR-G but were concerned about running the tire sidewall pressure as it would be too hard on the trailer.

There was also some confusion about the "Maximum" allowable inflation.  I said:
"The inflation on a tire sidewall is the MINIMUM inflation pressure needed to support the MAXIMUM load (also molded o the tire sidewall).
There is a sound scientific reason to run higher inflation when running tires on multi-axle trailers. It is called "Interply Shear". This force is what can result in belt/tread separations. I have covered this in detail along with references to technical papers on the topic.
IMO you need a minimum of 15% "head-room" of load capacity over the measured load of the heavier end of an axle. (CAT scale only gives the total on an axle and very few RVs have 50/50 load split. Some folks have discovered unbalance of 500 to 1,000#)
Most cars come with 20% to 40% tire load capacity headroom. I run 25% on my Class-C.
"
Which resulted in this reply:
"So if a given pressure (below the tires maximum) still provides the necessary headroom over the measured load, it's okay to run it, correct? Or am I not understanding something? "

This leads me to respond:
"I wish it were that simple but all radial tires have the Interply Shear force. It's a question of how much "tire life" is being "used up". The force results in microscopic cracks forming between the two steel belts at the outer edge. Once cracks form they do not repair themselves but can only grow.
No good tool or math model can turn Shear Force into Miles of tire life is "consumed" as there are just too many variables.
Finite Element models simply indicate that higher inflation can result in lower shear force every time you turn a corner or every time a tire completes a revolution. 

About the best you can do is to do a close visual inspection (Free Spin) to look for signs or out of round or side to side runout which are strong indicators of internal structural tears. I have a video and pictures of the autopsy I did on a tire where you can see the separations running across 50% to 70% of the tread width. This large separation might run a thousand miles or under certain circumstances might fail tomorrow.
Think of it like your Blood Pressure. Higher is worse. So the question is at what number can you expect to have a fatal attack?
If you consult your owner's manual you will see a suggestion that 3 to 5 years is the max expected life but obviously someone that runs at or above Max Load and above 65 mph and drives 4,000 mi a year is more likely to suffer a failure than someone that only drives 2,000 mi, never faster than 62 and at only 80% of tire load capacity.
Moving up one Load Range C>D or D>E can probably expect longer tire life if they also go from 50 to 65 or 65 to 80 psi. Going to LR-G in a Commercial grade all-steel tire should result in longer life even if you don't run 110psi.
Since load capacity is shown in the Load/Infl tables then I would suggest trying to get to 20 to 25% Reserve Load would be a good move. You still need to watch max speed and minimize sharp turns (as seen when backing) and of course, do a good free spin inspection once a year or once every 2,000 mi whichever comes first. Plus run a TPMS to confirm you never run lower pressure than your goal
."

I realize this is a long winded post but hopefully, you can think about the ideas and concepts we are discussing.  Easy questions do not always get simple answers, Especially when talking about a complex topic.

##RVT888


Friday, May 18, 2018

ST tire Belt Separation "Autopsy" "How To"


This info is from an inspection I did a while ago. Some may find it informative.  A friend wrote a post on an RV Forum of his experiences and the results of my "Cut Tire Inspection". He posted:

[image]"This summer I had a tire failure, 3 actually in all by the time I was done. If you are into the details of tire failures, this is one type of tire failure. This is a little long of a post, but there are lots of pics to go with the words and some background.
I'm not a tire expert by any means, just a machinery guy trying to figure out what went wrong with my rig so I did not repeat the same problem and could correct what went wrong. So I took this one as far as I practically could.

I caught the first failure here in my yard doing axle maintenance. When I jacked up the camper to put it on jack stands, my left rear tire would not clear the ground on the normal stand height. H’mm OK what’s up?

[image]
I looked at the left rear tire and it looked more round across the face than I remembered. I still did not know what the issue was at this point.
 [image]


I jacked it up some more and started to take the tires off. I took all 4 tires off and I could see one tire, the left rear looked different. It was more curved across the face of the tire than the rest. Laying it on the ground it showed up more not be square to the sides.

Here is a normal one

 [image]
After comparing the other 3 to this one rear left I measured the OD of the tire. Yup, it is 1” larger in OD circumference. OK, something let loose inside this tire.
 I put this bad tire aside, finished up the axle work, and put the spare on. I then tried to figure out what was wrong with this tire. Looking on the outside I really did not see anything much that was wrong with it other than about 180 degrees around the outside, the tire progressively was getting larger in OD up to a high spot then starting coming back down. Whatever was wrong with it created an out of round tire.

 [image]

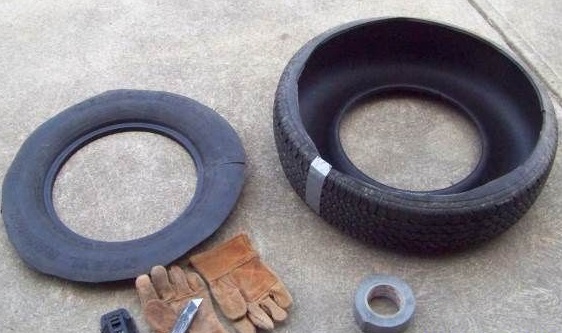
I demounted the tire and looked inside. Nothing really looked wrong to me inside. I happened to have a fellow RV buddy who is a retired tire engineer who has done tire failure analysis for most of his career. We hooked up and he told me how to section the tire and send it to him. So here is how we did this. He told me how to cut out the side walls. I was shocked you can cut up a side wall this easy. There is an inherent danger in doing this. Heavy gloves and a sharp knife is a must. Once you start cutting it out it sort of unzippers. You start above the tire bead and cut towards the OD, then start and cut around the circumference.
[image]
Now I had a donut. The hard part is cutting through the steel wire in the tire. Ideally, you do this on a vertical band saw with a progressive tooth blade. The rubber wants to bite and grab the blade. I did not have a large enough vertical band saw so I used a Sawzz All. Here one really has to clamp this thing down or the rubber will grab and start shaking the saw violently. You do not want any blade pinch as the rubber bites into the blade. Need to back flex it to keep it pulling apart as you cut. I clamped it to some old sawhorses and cut it apart.

[image]
[image]
Now I looked at the cross-section. Well, nothing real exciting at the 90-degree point from the high point.


[image]
 So I curled up the sample to fit in a box I could UPS to him. Here it is
[image]
I  sent him the tire and then started to investigate if I did something wrong to cause this failure. I always check tire pressure and run max cold sidewall pressure at the start of every trip. I even have my own small compressor in the truck if I need it. So under inflation was not the problem.

I also do not tow faster than 60 mph. I do not need to, big truck or not this is a safety limit for me. So I was not overrunning the 65 mph max speed rating creating excess heat.

I use white tires covers when the camper is at home. These tires are 3.5 years old at this point. I can say the first year they were only 50% covered until I have my present tire covers in place. There really was not much tire cracking. No sidewall cracks, some very fine in tread cracks and there were several stone cuts in the valleys of the treads.

Next was weight. I had not been to the scales in about 1.5 years and I added some upgrades. So I loaded the camper with stuff for a campout and full freshwater as we do haul water to some camps. I went to the scales and weighed each axle with WD engaged. I could not get each wheel position at the scales so when I came home I used my force jack to get each wheel position. Here is the weight chart.
[image]
The failed tire location has 12.5% extra tire capacity or 318# from the max load. There is some error in this data as my force jacked weighed a little heavy. It did, however, show me that the 4 tire locations are different. The front axle was pretty equal, the rear axle very different. My fresh tank sits right over the front axle which may have had something to do with the front being more even. At this point, the weight did not seem to point to a glaring problem.

Since I could not find anything wrong, yet anyway, I bought a new Maxxis tire for the spare and we headed off on vacation. My tire buddy also was on vacation so he did not yet have my tire done.

On vacation, I was 800 miles from home on the NYS Thruway and while gassing up, OMG… This tire right side rear tire does not look good. Dang, it looks like the failed one. So we pulled over in the truck lot and took it off and put the spare on. Yup, it let go too like the 1st one.


[image]
I was lucky a 2nd time I caught the failure before it let go. If you are going to have to change a tire on the road, the NYS Thruway makes a good changing spot… OK so now I have no spare…. I’m thinking of where I can get one when I get to my Mom’s house. Well…. No luck finding one close by. We did make it home OK. Another 800 miles.

When we made it home I was already working on changing tires to LT tires. When I jacked up the camper to take off the ST’s, OH boy, another one…. The tread bulged. This tire would not even roll correctly it wobbled so bad it would fall over.
[image]
So I dodged the 3rd bullet. I could not see this when it was on the camper, only when I took the weight off. The damage did not yet progress far enough yet or it was not out in the open where I could see it.

Soon my tire engineer buddy was done investigating the 1st tire I sent him. The tire failed for what is called “detachment” or what is nicknamed sometimes “slipped belts”. It is where the tread separates where the steel belts are in the tire tread from the main tire. Basically the tire unbonded itself inside the tread. Here are his analysis pictures.

He sectioned the tire sample I sent him and knowing what to look for starting to see clues of the problem. You can see small separations at the yellow arrows.

His description was “Cut 1 was my initial cut away from the identified bulge area. There are small detachments identified. If this was all that was found in the tire it would not be a serious issue.”
[image] 

Then he sectioned again and he found the entire area let go.
His description was
“Cut 2 location was identified by careful measurement of tread depth and I found a location with more wear than in other areas. The large detachments between the belts on both shoulders can be seen”


[image] 

 [image] 
[image] 
 [image]
His description was “Detach 1a & 1b show the length of the detachment to be over 11" long” 
 And this one really shows the detachment separation.

[image]
His description was “Detach Width shows the width of the two detachments relative to the tread width”
asked him how did this happen? His response:

Why detachment?
There are several things that can cause this. They would primarily be a breakdown of the rubber that coats the steel. This could be due to a manufacturing error or simply the selection of a lower strength rubber which cannot tolerate the forces applied to the tire. Only lab testing can determine that. Sometimes detachments can be initiated by tread cuts or punctures but that does not seem to be the case of the tire I inspected. Detachments are one of the more difficult conditions to analyze as there is a need for a lot of additional background information and data.


From this investigation, I have a perfect case to file a report with the NHTSA as I used the tires within the ratings. I have since filed 3 complaints, 1 for each tire. I’ll create a thread on how to do this filing. It is the only way we as RV’ers can help this cause of trailer tire failures become more known to the right people who can help. See here How To File a Tire Failure Complaint

There is now a growing understanding that for tandem trailer applications that a 20% more tire capacity reserve is needed to help hold up to the service of a multi-axle trailer. In my case I am towing heavy, I am not overloaded, in relation to my tire capacity. When I upgraded I targeted to get as close as I could to the 20% reserve at the heaviest loaded tire. I had a choice of load Range E in the ST or go to 16" LT and deal with tire wheel well issues. I weighed the options and went LT. See here for more on the LT change ST225/75R15 to LT225/75R16 Conversion

While LT tires may not be for everyone, knowing your weights of each tire location and where you are in relation to the tire capacity reserve is something you can do. You can also not tow over 65 mph on ST tires, keep them at max sidewall cold pressure at the start of each trip and use white tires covers over them when the camper is in storage.

I hope this helps someone in the future.


Friday, April 27, 2018

Sidewall "Bubble" or ? A Tire Autopsy

Took the wife's Miata down for an oil change and tire rotation. Contacted by the store, that they had discovered a "Bubble" in the sidewall and wanted to know what I wanted to do.
After a quick look at the location of interest I concluded that we were looking at a Sidewall Impact Break. I had the store replace the tire with a new one and asked that the allow me to do a "Failed Tire Inspection".  Here is what I found.

Picture 1 is of the inflated LF tire on the car.
You can easily see the "Bubble" on the sidewall under the molded word"OUTSIDE". What tipped me off to the damage being an impact and not a sidewall bubble or blister was the shape (more radial in nature than round) and the gradual nature of the rise of the shape. Sidewall blisters are normally more abrupt.


The interior picture is what we see inside the air chamber at the location of the sidewall "bump".
I have an arrow pointing at the stress marks of the body cord on the inner liner rubber.


Picture 2 is of my initial examination cuts.   Note I did not cut directly through the area in question as I did not want to destroy or contaminate the "evidence" that I suspected would be found in the area of interest. This is an important point that many inexperienced investigators sometimes miss.


In picture 3 we see the location of interest. I added an arrow that points to area os special interest. If you look closely you will see a short dark line. This is a depression where the interior rubber has been "sucked" into the damaged area of the sidewall,


After removing the section of the tire, close examination revealed some of the initial Innerliner cracks / tears.  Here is a close-up shot.


These cracks would grow and could eventually result is air loss through small cracks in the sidewall. It is important to consider that the cracks will not grow in just a couple of miles or maybe not even in 100 miles but if driven long enough would most certainly result in an air loss. The driver would have no recollection of ever hitting a bad pothole or road debris so in all likelihood simply claim that the "Blowout" was due to some tire defect.

 Finally, we can see the separation of the body cord from the surrounding rubber. It is possible for this type of separation to allow the cords to move independently from the rubber next to the cord and the rubbing can generate heat which under the right circumstances could lead to a cord failure.
Again this could take weeks or months to progress to a loss of air but is another example of why few drivers connect the effect of a tire losing air to the real cause of suffering a sidewall impact break.

This break was actually quite minor. A more severe impact was covered in THIS post.

Monday, June 12, 2017

"Dry Rot" is a misnomer regarding tires

Read this on an RV trailer forum, but most of the info applies to all types of tires.


"My understanding is that there seems to be a belief or a known orthodoxy that despite external appearances, the inside could rot out and that tires that appear all fine and dandy on the outside, after that long are not on the inside?

I believe the only "proof of concept" is common anecdotal experience:

People have owned tires that appear fine that are "old yet all seems fine", and they experience unanticipated tread separation and such....several anecdotes to the point of it being a "common wisdom" best I can tell.

Beyond that, I have not seen a "more objective" verification of this...in my mind, after the death of such an "old yet otherwise in good shape and used properly" tire, an autopsy of that tire could show evidence of this "rotting from the inside"....I am not sure anyone has posted details about what that would look like (beside unexplained otherwise tread separation)?

Absence of such "more objective review", I am very very inclined to accept the common wisdom or orthodoxy on this matter until clearly proven otherwise as the cost of being wrong is potentially massive comparatively!!!!!!!!! Many many posts on this site have expressed huge regret about pushing past such "widely accepted advice"

My response to the above:
I did "tire autopsies" for decades before retiring. I have even posted pictures on my blog and have over 30 posts that have "Failure" as a label. Best advice I can give is to read and review the information on my blog. Listen to the only two (to my knowledge) actual tire engineers on RV forums: myself and CapriRacer.

"Dry Rot" is a misnomer. Rubber is a long chain polymer. The chemistry is such that the polymeric chains break down over time. The rate the chains break is related to heat and other energy (UV) input. Nothing is actually "drying out" or "rotting" in the common understanding of the word. Sidewall cracking (dry rot) is just a symptom that suggests the internal rubber compounds have probably lost some of their elasticity, which increases the potential for cracking, which may lead to separation.

There is no single answer to why some people have longer tire life than others except for the fact that some operate their tires at higher temperatures (load, speed and inflation plus ambient temperature) than other people.

Any tire can fail with a Low Inflation sidewall flex failure or "Blowout". Radial tires in trailer application are exposed to significantly higher Interply Shear forces due to suspension design that the tires on the tow vehicle - See my post on Interply Shear.

While operating a tire can help the "Anti-Oxidants" or AO's migrate to the surface, simply driving the tire is not IMO an efficient or effective thing to do, especially when we consider that cleaning of the tire sidewall, which will remove the AO's, can result in more harm that any driving around can prevent.

How many of you have bothered to make load and inflation adjustments necessary for driving your ST type tires any faster than 65mph?

Do you even know the actual loads on your trailer tires?

How many do an annual "free spin" inspection of your trailer tires?

How many are running TPMS (tire pressure monitoring systems) so you get warned when you drop down to the minimum inflation needed to support the measured tire load?

If you feel that checking your pressure with a hand gauge is sufficient, do you make that check every 10 to 15 minutes of operation? If you have a tire leaking air you can destroy it in just a few miles, so the fact you checked the air 4 hours prior to the failure is of no importance.

Sorry for the rant but the FACTS are out there. It takes a little effort to drastically reduce the potential for premature tire failure. There is no magic snake oil spray that will make your tires last 20 years. There are steps that you can take to get 5+ years of life in trailer application and 7+ in motorhome and tow vehicle application.

##RVT798

Wednesday, October 26, 2016

"I inspected my tires but still had a failure"

Read this on an RV trailer forum:

"Checked the air in all 4 tires and inspected them before we pulled out. We made it 20 miles from the house when the first tire let go. The tire service center and I both checked the remaining 3 and the spare. They had the correct air pressure and no signs of any issues. We made about 15 miles down the road and the second 1 blew out -- 2 roadside assistance calls and 2 insurance claims. I am not happy with dynamic tire or (RV trailer company name) at the moment."

I offered the following comment:

Sounds like the "inspections" being done are not sufficiently detailed. A "proper and complete" inspection doesn't consist of checking the outside sidewall and most of the tread for % tread wear. A LOT more is required if you want to improve your chances of finding the early signs and indications of impending tire failure.

In this blog, I have previously covered what I would consider a thorough inspection with example of what a failing tire looks like externally, and then I did an autopsy to show the actual condition of the subject tire. Note that the person making the video felt the tire had failed and cut the tire looking for the belt separation but even though he has an engineering and mechanical background, he failed to properly identify the location of the failure. IMO this was because he simply had not had enough experience in tire forensics, as you probably have to do a minimum of a few dozen autopsies before you can easily and quickly know where to do the cutting -- and that would be what is needed to find a large separation as seen in the subject tire. Smaller issues are harder to find and take a more experienced eye.

The free spin can be sufficient to establish that the subject tire is in the process of failing and should not be driven on.

Today it is popular in politics to complain about "the elite" and to disdain experience, but I believe that there are many fields where actual experience is necessary if you want competent results.

Very few tire service people have been given the opportunity to do investigative-level tire inspection, as their job normally doesn't require issuing a detailed report that identified the root cause of a tire failure. This not the tire tech's fault nor is it the fault of the tire store owner. You might liken this to the store clerk at a CVS or Walgreen pharmacy. They are simply not fully knowledgeable in the interaction of medications, which is why a Pharmacist is the person responsible to fill prescriptions, but I would not trust a Pharmacist to do surgery.

Sometimes competence only comes with experience.


Subscribe to the weekly RVtravel.com newsletter or one of our other newsletters about RVing. Great information and advice. Now in our 16th year. Learn more or subscribe.


Tuesday, July 21, 2015

How to avoid tire failure and RV damage. And I had a tire failure!

A general comment on tire inspection and how it may be able to prevent RV damage due to tire failure if done properly.

There are three basic types of tire failures.

- The least likely is a sudden large impact with some object in the road. This is the least likely and is actually difficult to do. By this I mean to have a tire that is OK with no damage having been done due to excess heat, high load, low inflation or improper repair. It could even be a new tire. You drive over something like a Railroad spike or into a foot deep pot hole or over a 10" chunk of scrap steel that fell off a truck. It has to be large and you have to hit is just right for the tire to suffer immediate failure. I know from personal experience (doing a special test project of tire "Rapid Air Loss") that even driving over a piece of 2" pipe sharpened at one end and standing 2" up in the road with sharp end up doesn't always cut through the steel belts of a tire.  Yes you might run over something that cuts the tire but you would see it in the road and hear it hit but most of the time the air loss is not immediate. The good news about this type of failure is that it has a very low probability of happening. I would guess that fewer the 5% and maybe less than 2% of RV tire failures are of this type.

- Next is the belt separation. This is when the tire tread and belts come off the body of the tire. This is usually the result of tire aging and long term cumulative heat related damage that reduces the flexibility of the rubber to the point that rather than bending the rubber develops microscopic crack which do not heal themselves but will grow. Excess heat and tire aging can come from many sources. Even parking in direct sunlight with "tire protectant" spray does not lower the temperature of the tire. Excess heat can accelerate the aging or the tire rubber properties and drastically reduce the tire life. I would expect that if properly diagnosed this type of failure occurs 25 to 40% of the time. The good news is that with proper and frequent tire inspection this can be discovered and the tire replaced before it comes apart enough to cause damage to the RV. I did a blog post just on this topic "How do I inspect my tires" back in Aug 12 2014. You can Google the phrase and find a number of web pages on the topic but many simply are telling you to look at tread depth but this is not sufficient if you want to do a complete and competent inspection. My link included a YouTube video showing the inspection of a tire with belt detachment that has not come apart and the result of the "tire autopsy" I was able to perform. You can even see the separation between the belts in the above post.

- Finally there is what is commonly, and incorrectly, called a "Blowout". This is really a failure of the tire sidewall due to excessive flexing from running with significantly under-inflated ( probably below 50% of the inflation needed to carry the load. For Polyester tires (mainly ST and LT type) This heat due to flexing can be enough to reduce the strength by half and in extreme cases even melt the cord. For Steel body tires the bending of the steel can result in a fatigue failure similar to bending a steel paper clip till it breaks. This type of failure may be 60 to 80% of the failures on RVs. The good news is that if you run a TPMS you will get a warning of the air leak and hopefully you will not ignore the warning as too many do with other warning indicators on their dash, and take appropriate action which is to stop and pull over as soon as safely possible. Amazingly some people, even when verbally warned that they have a tire that is significantly under-inflated simply choose to continue to drive off. This has happened to me a number of times. As the saying goes "You can lead a horse to water but you can't make them drink".

So how doe this information help you "avoid" failure and RV damage. While nothing is 100% I bet you would like to be able to prevent 90% to maybe 98% of tire failures you might experience.

To do this I suggest that you run a TPMS and to get plenty of advance warning I suggest you set the warning pressure to be the minimum needed to support the load. Then your cold inflation pressure would be about 15% higher.

Next do a "free spin" inspection with lots of light. This is relatively easy with a trailer but harder to do as your axle load increases. You may even need the HD jack from a truck tire center and the spin balance machine to get that big 295/75R22.5 tire spinning at at least 20 to 30 RPM to allow you to see if there is "wobble" similar to the video in my post on How to I Inspect my tires" above. While the tire is in the air also do a slow rotation to inspect 360° of the tire tread as well as 360° of each sidewall looking for cuts and bulges. If any are found you should get the tire to a service center for a more thorough inspection that may include de-mounting the tire.

I believe that if you don't see any bulges or wobble and don't have any localized irregular wear spots in the tread you can be reasonable confident there is no large separation.

Remember nothing is 100% but if you make an effort you can significantly improve your odds of avoiding a tire failure.

Information to show you how this can work. Three weeks ago I was doing my annual 360° inspection. My tires are 7 years old so even though I know they have always been properly inflated (4 corner weights + TPMS from 2nd week of operation), I knew I needed to be sure all was OK. I discovered one of my duals had developed stress cracking from long term parking. This was a real surprise for me but it shows that even with the best of care rubber can get old and tires do need to be replaced.


  This tire was scrapped (I cut two slices from bead to tread to prevent its re-use by a "dumpster diver") as it still had lots of tread but I felt it should not be on the road.

Subscribe to the weekly RVtravel.com newsletter or one of our other newsletters about RVing. Great information and advice. Now in our 14th year. Learn more or subscribe.  

Tuesday, March 17, 2015

Understanding Tire Failure

Yes, when a tire fails there is almost always evidence left behind that points to the Root Cause. I have shown this in tire "autopsy" posts on my blog.

Some "causes" are easy to see or understand:
Punctures, cuts and external damage from hitting potholes or other "road trash" can lead to leaking air (fast or slow) or in some cases broken body cord (see my blog post on sidewall bulges).

"Blowouts" with sidewall flex failures are most likely the result of air leak, not just low air pressure due to poor maintenance. The leak could be caused by puncture, cut, leaking valve, cracked wheel or the like.


Other failure modes are harder to detect, such as:

Belt separations come from long-term heating of the tire belt/body interface. This heating comes from a combination of insufficient air pressure for the load and excessive speed.

Now while separations may be harder to detect, many can be found if a little effort is made by the person doing the tire inspection.

I previously published a video showing one way to "measure" a defect.

Sometimes you don't need to "spin" or rotate the tire but just get a good look at it and roll it across the floor for a full revolution as one part may look OK while another portion clearly would only look straight to a drunk.


If any of your tires look like the above, I would bet $$ that they had a belt separation similar to what is seen here.


Driving on a tire in this condition is simply asking for trouble as it could come apart when you least expect it as you drive down the road.

As we move out of Winter and you "DE-Winterize" your RV, especially trailers, Please take the time to do a thorough tire inspection.  Spin or off-the-vehicle inspection is much better than a stationary on-the-vehicle "Look At".


Subscribe to the weekly RVtravel.com newsletter or one of our other newsletters about RVing. Great information and advice. Now in our 14th year. Learn more or subscribe.