THANKS TO OUR SPONSOR!

THANKS TO OUR SPONSOR!
Your Ad here
Be sure to sign up for the weekly RV Travel Newsletter, published continuously every Saturday since 2001. NOTE By subscribing to RVTravel you will get info on the newest post on RV Tire Safety too
. Click here.
Huge RV parts & accessories store!
You have never seen so many RV parts and accessories in one place! And, Wow! Check out those low prices! Click to shop or browse!
Showing posts with label Certification label. Show all posts

Friday, January 28, 2022

Your RV or car or truck Certification Sticker

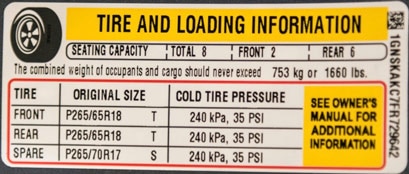
This "sticker" has some critical safety information you should know. I don't expect you to memorize all the information but I strongly suggest you snap a picture of the sticker, keep it on your phone, and know where to find it. It has information that is critical when it comes time to knowing the proper tire inflation and when you are shopping for replacement tires.

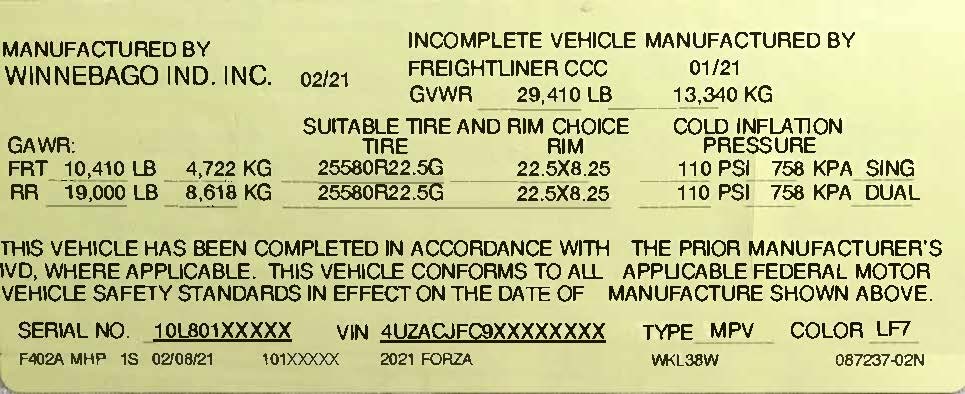
First the basics. The Vehicle Certification label may be an embossed metal plate or a printed sheet or a sticker. Years ago (before about 2010) the label could be almost anywhere in or on your vehicle. I have hears stories of people finding them in the glove box, in the car trunk lid or on the side of the passenger door. The best I ever heard about was on the inside of an RV closet door that could only be seen if you were standing inside the closet with both the sliding doors closed. It seemed that some felt it was a game of Hide and Seek. Luckily this has changed. DOT now has specific requirements for the information on the label and the location of the label.

Motor Vehicles: Cars, trucks and Motorhomes with driver doors. The sticker must be on the door jam of the driver door. If there is no door as with many Class-A motorhomes the label must be near the driver left elbow and visible from the driver's seat.

Trailers; The label must be on the driver side, outside, toward the front of the trailer.

What information is on the Label:   Tire Size, Load Range, Grose Axle Weight Rating or GAWR and cold inflation of the tires. Many also have VIN along with other information.

Currently DOT requires the inflation be the minimum inflation needed to support the GAWR. As of 2017 RVIA added a requirement that tires be inflated to a level that included a margin of 10% so if your RV MFG certifies your RV to be in compliance the RVIA standards that would be the inflation shown on the label. If tire size or inflation is different for an axle the information must be shown for each axle.

Here are some examples of the sticker found on the Internet.

Us Federal Certification Label - Best Label Ideas 2019 

Some RVs have more than one label

2022 Keystone RV Premier 26RBPR | Camp Rite RV

Below is a label from an SUV

Tire And Loading Information (Tire Placard) | Tire Rack

Winnebago Serial Number | Identify Your Winnebago 

##RVT1037

Friday, December 3, 2021

"65 psi is too much"

 "65 psi is too much" was the opinion posted by Tom when he said 

"Ok, I can’t find any info here so one last time. The tire pressure says 65psi cold on the side wall of the tires on my travel trailer. That sounds like a lot to me. What tire pressure do you run your camper at?" on an RVTips FB page. 

I'm not sure where he did his search. On the FB page, he did get some answers such as "60"  and "110" and "80".

 I responded:

 As an actual Tire Design Engineer, with 40 years of experience including decades of trailer ownership, I can explain why you need to follow the Science of proper tire loading and inflation. You have a Certification sticker or label on your TT that was applied by the RV company based on safety regulations. The sticker tells you the correct information for tire size, type, and Load Range. It also tells you the GAWR. You should not exceed the GAWR because you can break wheels, bolts, axles, hubs, springs, and related parts. Known strength limits of these parts were used to establish the maximum load you should put on your axles. The tire industry has tables that cover the dimensions and load limits for tires for different levels of inflation. These tables have been around since the 70's and all tires sold for highway use, in the US, are required to be capable of passing a number of different strength and durability tests. The test conditions specify both load and inflation levels for the different tests. The RV company has the responsibility to provide the information on the certification sticker such that the specified tires are rated to support at least 110% of GAWR when they are inflated to the stated inflation when the tires are at Ambient Temperature, i.e. "cold". You didn't offer what tire engineering experience you bring to this discussion so I don't know how you arrived at your conclusion that 65 psi cold (ambient) was "too much" but I sincerely doubt that the RV company would select LR-D tires if that level of load capacity was not needed. You can learn more about tires by reading some of the 500+ posts on my blog       www.RVTireSafety.Net


##RVT1029

Friday, June 7, 2019

Why not just inflate to the Certification label level?

I continue to read RV forum posts from people asking about what inflation to use. Tire Sidewall?, Sticker? Owner's manual? The inflation used by a neighbor? There is also continued confusion on what the sticker inflation is.
"Vehicle Certification Label" AKA "Tire Placard" only considers one thing. The max tire load capacity (molded on the tire sidewall) when the tire is inflated to the level associated with the original tire Load Range (Ply Rating) as shown in the industry load & Inflation tables.

Federal DOT Regulations specify the label indicate the tire inflation level needed to support AT LEAST  50% of the GAWR. NOTE there is no margin or reserve load capacity specified or required by the DOT Regulations.

Starting in Nov 2017, the RVIA (RV Industry Association) required that trailers have a 10% margin on tire load capacity. Motorhomes do not have this margin requirement from RVIA as far as I know.

This Reserve Load margin for trailers is more important than on Motorhomes due to the significantly higher Interply Shear imposed in trailer application.
Tire companies, do not know the exact loading that will be placed on their tires in RV application so you have to do a little work to learn the MINIMUM inflation needs for your personal vehicle. You could simply use the inflation on the Tire Placard but you still need to confirm, with scale measurement, that no axle is loaded more than the stated GAWR. It is also strongly recommended that you confirm your side-to-side load split is close to 50/50 as the tires do not "know" what the other tires are supporting, so you could be unknowingly overloading one tire by hundreds or even 1,000#.
I have other posts in this blog on how to learn the individual tire loads.

##RVT900

Tuesday, July 15, 2014

Can I change from ST to LT tires on my Trailer or 5ver? Part Two

In Part 1 we left off with having to do some calculation.

I will assume you have confirmed the actual individual tire loading and have moved some heavy items around to end up with a reasonable balance of loads,

I will also assume you still want to change from ST type to LT type tires which means you must increase the Load Range and or increase the tire size to get a load capacity in the LT to match or exceed the capacity of the OE ST type tires.

Now before we move on you need to realize that "LT" is a designation used here in the US and European and some Asian countries have what they call "Commercial" tires. These Commercial sizes do not start with LT or CO but will probably look like 7.00R15  or for metric sizes 205/75R16The "C" in this case is not the Load Range but stands for "Commercial". The Load Range will be identified as normal LR-C, LR-D etc or possibly with RL or XL for Reinforced or Extra Load. To make this post easier to read I will limit my comments to LT type tires. Just remember there are other options that may be better for those with 15" or 14" wheels that do not want to change rims.

NOTE: All of these letters and numbers are important when selecting a size so be sure you record them all when doing your research.

So on to step
#6 Dimensions. There are two key dimensions Outside Diameter or OD and Width. Now I am confident that we all understand OD but width can be a bit confusing. Depending on the wheel well contour the overall maximum width or "Section Width may be most important. Some tires may have a narrower clearance nearer the tread so they will need to do some actual measurements at a number of locations.
It may be easiest to use the dimensions for OD and Section published for your current tires and just do a confirmation with your tape measure. Remember tire "width" is not the same as tread width.

You need to be sure the tires NEVER contact any portion of the RV frame wheel well or bodywork. You should try to have equal or greater clearance with the new tires that you have on your original size.

7. The challenge
When moving from ST type to LT type you will need to move up in Load Range or up in Size or both.

Now comes the research to see what your options are
8. Knowing the target Load Capacity and the maximum OD and Section width, it's time to use the Internet to do some research. The objective is to find tires that meet your needs for the numbers and that are appropriate tread pattern. You certainly don't need Snow Tires or heavy traction tread pattern. I would suggest that the tread be identified for "All Position" or Steer for your trailer application.
You can go to web sites from large dealers such as Tire Rack, Pep Boys, WalMart, NTB, Discount Tire or similar. You might also just Google "Trailer Tire" + the name of a large city or town near your location.
Once on their web site find the various possible tires that meet your needs.

9. If you are increasing the Load Range with the associated increase in inflation you need to confirm the wheel can manage that higher inflation. The info may be marked on the back side of the wheel or you may need to contact the wheel seller or manufacturer or you may need to get different wheels if your OE seller doesn't know what the rating is for the OE wheels

10 Finally, as I have previously suggested in my post on "The Best Trailer Tire" you need to make your purchase decision not just on lowest price but need to consider the tire warranty, even if there is a Road Hazard Warranty. Also how easy will it be to get a replacement if your tire gets a sidewall cut or unrepairable puncture.

11. Last step:  After all this work we want to do a first class job. Some might want to say you can't change from ST type to LT type due to Federal Regulations. Well a friend Dave Gray has an excellent post just on this topic. He has even provided an example of what would be the appropriate label you should apply after making modifications to your RV.


I hope these two posts have helped you understand the steps, calculations, measurements and research needed to make such a change.


Subscribe to the weekly RVtravel.com newsletter or one of our other newsletters about RVing. Great information and advice. Now in our 14th year. Learn more or subscribe.


Saturday, June 28, 2014

Quick Summary here

I have been following a number of RV forums and want to do a bit of a summary for those that don't have the time or interest to read a number of posts on this Blog: Remember more than half of the thousands of RVs that have been checked have been found to have one or more tire and/or axle in overload. So nect time you camp you can be pretty sure that one or both of the RVs parked next to you are overloading a component.

- You should have a Digital tire gauge. I have posted the results of my tests of dozens of gauges that RVrs were using and the bottom line is that about 15% were off by more than 5 psi which  IMO makes that tire gauge a good door stop or tent peg. I have provided information on how to do your own gauge "Calibration Check" to confirm the accuracy of the gauge you use daily and how to maintain your "Master Gauge"

- If you follow the advice from the two Tire Engineers on this thread you will be setting the pressure based on the appropriate method here:
     - On your TV inflate to pressure based on the Door sticker and Owner's manual for "Fully Loaded" operation. BUT get on a scale at least once to confirm you are not overloaded.
     - If you have a multi-Axle trailer you should be running the pressure on the tire sidewall. I have written in my Blog and provided the technical justification and need to follow this advice. You should still go across a scale and calculate the actual tire loads to confirm you are not overloading one or more tires
      - If you have Motorhome you need to confirm your unit's "corner weights". Use one of the worksheets I have provided links to. Use Load/Inflation chart from your tire manufacturer, to confirm you are not overloaded and identify the heavier loaded tire on each axle. Using the pressure for that load add 10% (without exceeding the wheel max) and that is your Cold set pressure for all tires on that axle.
      - If you follow the above there should be no reason to be chasing your tire inflation around unless you have a major change in Morning temperature ( More than say 30°F ) as you would only need to "Top Off" the air once a month at most.

- Don't be too anal about inflation. Variations of 1 to 3 psi day to day are normal. You should not need to make adjustments unless the Cold pressure is 4 or 5 psi away from your goal. (Multi-axle trailers might try and get no lower than 3 psi below tire sidewall pressure)

- TPMS are a WARNING device and like Insurance we should all be using them. Also just like Insurance they cannot "Prevent" bad stuff from happening but with luck they may give sufficient advance warning to lessen the impact of the bad stuff that does happen.

- If you are parked for more than a day you need to cover your tires that will be in direct sunlight with WHITE tire covers. This protects against both UV and higher temperature damage which can shorten tire life.

Monday, June 24, 2013

Had a question about High Pressure

Most posts about tires and inflation warn about the problems of inflation being too low but I had a question about high pressure and felt it did deserve a few lines.

"High" pressure is relative.
35 psi might be high or way low, depending on the type tire just as 150psi can also be too low or too high again depending on the type tire and application. The bottom line is that each "type" tire and application has an inflation that we would consider the target. Most of the target inflation are given when the tire is "cold" which means at ambient temperature and not warmed up by running or by being in the sun.
At the extremes we might have a wheelbarrow tire or farm tractor tire which is designed to operate at relatively low inflation. Some farm tires are rated at 12 psi. Some Drag Race slicks are also designed for pressure below 24 psi.
At the other end we find aircraft tires needing 200 psi or more.

For our purposes we can limit our discussion to Passenger tires, Light Truck, Special Trailer and Truck/Bus type tires.
Passenger tires generally have recommended inflations in the range of 32 to 36 psi with some Extra Load tires rated at 41psi cold. If you read the sidewall of many passenger tires you will see a maximum inflation pressure stated on the tire. None of these inflations are the hot inflation so don't set or bleed down the inflation when the tire is hot. Many times the tire is stronger than the wheel and I have seen a few examples of wheels failing at a lower pressure than the tire when we put tires to a test of over inflation and head toward 100 psi+.

LT and ST tires have a number of different Load Ranges such as "C", "D", "E" and some even go to "LR-F"
The actual psi rating for each load range is not the same for all size tires so you must consult the Load & Inflation chart for your specific size tire. The cold inflation is also molded on the tire sidewall. In general you will see inflations range from mid 40's to 80 psi with the LR-F somewhat higher. As with Passenger tires usually the tire is stronger than the wheel but the inflations are still "cold" not hot inflations.

Truck/Bus have higher Load Range and accordingly higher inflations with some at 120 psi range.

The one constant SAFETY WARNING is to not set the cold inflation higher than the rated inflation for your specific tire and Load Range but also do not bleed down Hot tires. Tire Engineers know that tires will heat up and we test our tires at highway speed and above when the tire is fully loaded and design the tires to handle the hot inflation.

Over-inflation tires make for spectacular explosions. A quick search on YouTube shows a number of   examples .
Sometimes it is the wheel that fails.

Improper inflation can kill.


In general we see that new tires are capable of handling from 200% to 700% of the cold inflation molded on the tire sidewall when we do a burst test in the lab. With that large of a range there is no single number I can provide. The other thing to remember is that internal structural damage from pot-holes and curbs and road trash as well as simple age can reduce the maximum strength capability of a tire so this compounds the problem of providing a maximum safe cold inflation other than that molded on the tire.

Bottom Line.
Do not exceed the maximum inflation identified on the tire or wheel.
All inflation specs are COLD i.e. Ambient inflations
Confirm the max load on each tire will never exceed the load capability for your "set" cold inflation per the published tables.
DO NOT bleed down hot tires
If unsure, let a professional tire service person mount and inflate your tires on the wheels.

Monday, May 23, 2011

Certification Label otherwise known as a “Placard”

Along with others who deal with tire questions, I too often incorrectly assume that the information on all placards is complete, correct and consistent and that the owner knows where to find this sticker. This incorrect assumption comes from looking primarily at car placards from vehicle manufacturers that have regulatory compliance engineers working for them.

However, when it comes to the information on these labels for RVs, there have been significant changes in both the information that is included and the location for the placement of the sticker and it seems that not all RV manufacturers pay as much attention to the accuracy of the information on the placard as others.

Do you know where your placard is located?
Are you sure the information is both complete and correct?


Over the past few years both the location of the sticker and the information requirements have been changed.

Newer Cars and Pick-ups will have a color sticker with this information.

This sticker will be located on the driver’s door jam


When it comes to full size RVs you may find the placard in a closet


Some Class-A units will have the stickers near the driver’s left arm location

Note the lack of complete tire size on this older sticker with only the rim size identified.

Newer Class A should have a placard at the driver's location.

But may have more complete information in another location like a closet.


This newer Super-C seems to have all the information the owner needs.


Some owners will be lucky and have actual unloaded weights.


Finally here is an example of a placard applied by a manufacturer that didn’t follow the requirements. Clearly the trailer does not have two 12,000 Lb axles running dual tires and the tire cannot carry 6,000 Lbs each. There might have been a recall if the trailer manufacturer was still in business.


The bottom line is:
1. Find and know the location for the placard for all your vehicles.
2. Make a note of the minimum inflation as recommended by the vehicle manufacturer and add this information to your travel check-off notebook
3. Confirm you have the same size and Load Range tires as identified on your placard.
4. If you find a difference or have a question snap a picture of your placard and send me an email with your questions –tireman9@gmail.com- and I will try and help sort out the questions you might have.