THANKS TO OUR SPONSOR!

THANKS TO OUR SPONSOR!
Your Ad here
Be sure to sign up for the weekly RV Travel Newsletter, published continuously every Saturday since 2001. NOTE By subscribing to RVTravel you will get info on the newest post on RV Tire Safety too
. Click here.
Huge RV parts & accessories store!
You have never seen so many RV parts and accessories in one place! And, Wow! Check out those low prices! Click to shop or browse!
Showing posts with label Free Spin. Show all posts

Tuesday, July 9, 2024

Improper trailer brake setting

Just a quick post with the "Evidence" you might need to confirm improper brake force setting on a trailer.

This is definitely "Brake Flatspotting" from trailer tire lock-up. Higher force on relatively light loaded tires can cause this. Once there is a spot the next time you hit the brakes the tire is more likely to stop at the same spot again.

Here are some examples removed from passenger cars. ( note your ST type and LT type tires will look similar)


It might be a good idea to check your brake settings every couple thousand miles such as when you re-pack your wheel bearings.

 Did you take a close look at the tread surface when you did your last 2,000-mile tire "Free Spin" inspection or when you re-packed your wheel bearings on your trailer?


Friday, August 26, 2022

Can you do a tire "Autopsy" at home?

 When you have a tire failure many people are only interested in replacing the tire as soon as possible. But there are others that want to understand the "why?" of the failure so they can take the steps necessary to avoid a re-occurrence of the problem for if you don't know the real basic reason for the failure any corrective action you might take may not actually "fix" the problem.

Think of a car not starting. If you jump to the conclusion that the reason for the non-start, is a bad battery when it really is the first signs of a failure of the starter motor or a failure of the ignition switch, the new battery will not "fix" the no start problem will it?

Now I am not saying that everyone needs to have the tools and skill to do the "autopsy" shown below but when I was working as a Forensic Tire Engineer I was expected to dig deep and to learn the real reason for a tire to fail. 

It is in my basic nature to be inquisitive, so when I was contacted by an RV owner who had what he thought was a tire about to fail I decided that I could help him learn and understand the "why" when he started asking questions as many engineers do.

The following is what we did and what we learned.

As you can see the tread is very round.


This is not normal for a steel belted radial tire.


John, the owner measured the OC of all 4 tires and found a big difference with one tire being an inch larger than the others.


Clearly something was different this tire.


After removing the tire from the rv and looking closely at the tire he noticed that one portion of the tread seemed to "bulge" outward.


His next step was to confirm the tire was no longer round.


 After de-mounting the tire and inspecting the interior he said he could not find any indication of failure. At that point John contacted me and after some back and forth I told him how to dissect the tire so he could ship the tread portion to me for a more detailed inspection.

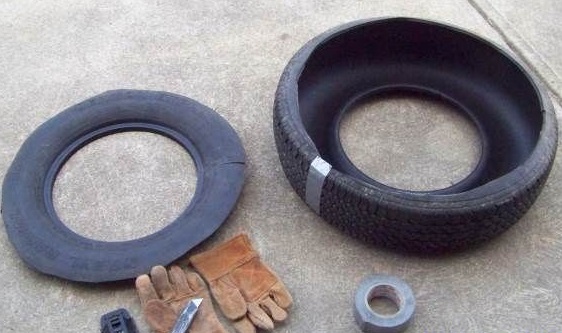
You can see the work he had to do to get the tire tread area cut from the rest of the tire.


This was John's effort to

find the belt separation,

but he was not sucessful.

When I received the tread my experienced eye quickly found the location of the belt separation.

This level of effort on John's part was extraordinary but we got the evidence to prove a belt separation as the reason for the bulge in the tread area.

Now you don't need to go to all this effort as a simple "Free Spin" inspection as seen in this YouTube video will provide the evidence you would need to decide if it is time to replace your tires.

I have recommended that owners of RV trailers do a "Free Spin" inspection once a year or every 2,000 miles. This schedule might line up with when you inspect brakes or re-pack the wheel bearings so the Free Spin is not any additional effort and if you discover a wobble or bulge in your tire you know that it's probably time to replace it rather than wait for it to come apart on the side of the Interstate. 


Tuesday, August 12, 2014

How do I inspect my tires?

Got an email the other day asking about inspecting tires. This blog and many others will tell you that you should do a thorough inspection annually and doing the inspection becomes more important as times goes on.

The problem is, few know even the basics of proper tire inspection. For some it's only looking at the tread to be sure there is some tread pattern available. Others will bend at the waist and look at one sidewall to inspect for large cracks.

Well, sorry to say that doing a proper tire inspection is a lot more involved. You will need to get down on the ground, you will get your hands dirty and you will need a good bright work light. A dim, old style flash light doesn't provide either enough light or uniform lighting to allow a good visual examination. So lets start with the tools you will need. I suggest a rug or old blanket so you can lay down and even scoot part way under your RV to see the back side of the tire. For lighting a work light with at least 75 watt rating. As a low cost alternative if you don't already have a work light is the inexpensive LED light similar to THIS one or even THIS one. Note the low costs for these lights. A pair of thin gloves. You need to be able to feel bumps and bulges on the tire so thick leather work gloves like these


 will not do.I know that many have disposable thin, Latex or Nitrile gloves they use when handling their holding tank hose and that type or similar will work fine to help keeping your hands cleaner as tires are very dirty and rubbing your fingers across the sidewall will transfer oils, waxes, dust and dirt to your fingers.
Finally don't forget safety glasses. Dirt can drop from under the RV onto your face or when you are removing objects from the tread they can pop out and hit you.

We need to be consistent and thorough in our inspection as we need to cover 100% of both sidewalls and 100% of the tread. This also means that after you have inspected all your tires you will need to move the RV a couple of feet so the portion of the tread that was on the ground can be seen. Depending on your RV, there may also be areas on the inside sidewall where the tire is too close to the frame or other component which prevents a clear view of that part of the tire and this may require a couple of small moves. When going under your RV be sure the engine is off, the transmission is in Park and you have blocked the wheels from moving either direction.

The following applies to all tires. If you have a towable there are some extra steps you NEED to do and we will cover them later.

On to the INSPECTION


1. Tread. You are looking for nails, screws and other items lodged in the tire. Sometimes you will find rocks wedged in parts of the tread pattern. It doesn't hurt to remove them using a screwdriver as sometimes stones can "drill" into a tire causing damage. I would not use a knife or other sharp tool. If you find a nail or screw in the tread, it is possible that the object goes all they way into the air chamber and if removed may cause an air loss. If for example you find a screw you might start to remove it but if you get more than 1/4 to 1/2" loose and the screw is still in the tire I would screw it back in and seek service as you don't want to lose air by completely removing the screw if you are not a a location where your tire can be easily be changed. Making this decision takes some thought to avoid making the problem worse.
While looking at the tread see if the pattern looks uniformly worn both across the tread and around the tire. Non-uniform wear may be a sign of an alignment issue and in some cases are an early sign of a structural problem internal to the tire like THIS,

or it may not be serious and is just cosmetic.

If you see some localized wear and want it looked at by a tire dealer it helps if you make a notation using the letters and numbers on the sidewall for reference. An example might be "Local wear on Right Front, inside shoulder of tread, starting at number 3 clockwise to letter G".  Giving a dealer this guidance will do two things. One it will save them time in locating the area of concern and two it will let them know you have done a thorough job of inspecting tires so they are less likely to ignore you and more likely to treat you as a knowledgeable customer that knows something about tires. This is a lot better than telling the dealer "The tread on the front tire looks strange".
While we are still looking at the tread we also want to note for more detailed inspection  any cuts that are deeper than 1/16" in the grooves.

2. Sidewalls:  This applies to both inner and outer sidewall. First do a general inspection for cuts or punctures. Punctures in the edge of the tread and down to the wheel should NOT BE REPAIRED. Some people may claim to have done a satisfactory sidewall repair but there is just too much flexing for a repair to last. There are published GUIDES that show the only location (in the tread) where a repair is acceptable. This applies to ALL BRANDS of tires.  Any cut where the body cord is visible means the tire is scrap and should not be used. Next we want to find bulges. You want to feel for bumps and bulges using your fingertips and gently slide around the complete surface of both sidewalls of the tire. If the frame prevents this then you need to identify where you could not feel the sidewall so you can finish that part of the sidewall after moving the RV. Bulges can be a sign of broken body cord. I recently did a POST on broken body cord on one of my personal tires.
Depressions however are probably OK as for tires with multiple ply such as most LT and ST type tires this is just a small overlap where extra material is located. if in question just note the location as mentioned above
and ask a dealer to confirm.

Trailers: Tires on towables seem to have a much shorter life than tires on motorized RVs like Class-A, B or C. Part of the reason for this is the unique and higher structural loading placed on these tires during any turning. The sharper the turn the higher the stress is on the tire ply. This loading is working to tear the tire apart. These forces can lead to separations which ultimately can lead to tread and belts being thrown off the
carcass and in extreme cases a rapid loss of air when the belt separates. TPMS will not provide warning of a tread separation so the only tool available to RV owners is a thorough visual inspection.

The good news is that many times these separations can be discovered by doing a "free spin" inspection as seen in THIS video. At the beginning, you see that the wheel is round and shows no side to side movement. Then we see the tire as it wobbles side to side and even is out of round. This tire has failed and must be replaced at once. Here you can see when I did an "autopsy"

we discovered the belts are almost completely separated on this tire. To do a "free spin" you must get the tire up in the air so it rotates freely. Thus can be done with a jack or even one of the ramps that will raise one side of the trailer high enough as seen in THIS video. This is just one example.
As you can see there is some work involved but doing a thorough inspection may prevent serious problems later on down the road. You will also find that after doing a few tires you will become more knowledgeable about this important safety item on your RV. your tires.

NOTE Repair Guide link fixed 7/5/2019

Subscribe to the weekly RVtravel.com newsletter or one of our other newsletters about RVing. Great information and advice. Now in our 14th year. Learn more or subscribe.